crown moulding - Step 1: Plan Your Installation.
- Step 2: Measure the Room and Mark the Stud Locations.
- Step 3: Put the Moulding Against a Framing Square.
- Step 4: Begin at the Wall Opposite the Door.
- Step 5: Lay out the Cope Joint.
- Step 6: Set up the Miter Saw.
- Step 7: Undercut along the Profile with a Coping Saw.
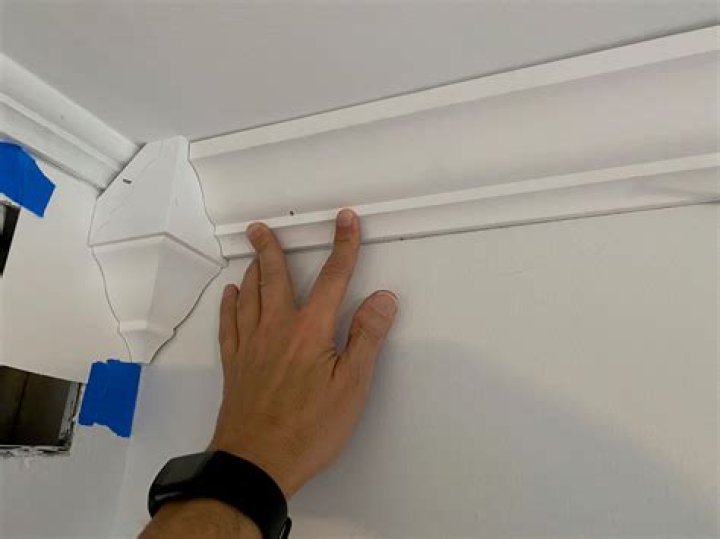
- Step 8: Test-Fit the Cut.
.
People also ask, how do you install crown molding on an uneven ceiling?
- Install flat trim molding against the ceiling as a nailing backer before you install the crown.
- Span the wall and ceiling trim pieces with the crown molding.
- Pair the new crown with thin trim molding, such as 3/4-inch half-round, on the ceiling a few inches from the crown molding.
Likewise, what size nails do you use for crown molding? Crown is typically nailed up with a 2” finishing nail and a compressor and finishing gun. Outside corners are usually done with a brad nailer and 1” brad nails with glue. Studs are generally 3-1/2”, drywall a ½” and the crown moulding a minimum of ½”; therefore 2” finishing nails are necessary.
Furthermore, where do you put crown molding?
As we mentioned, crown molding is often installed between walls and the ceiling or the wall and the floor. This gives the room a seamless, elegant appearance.
Where To Install Crown Molding
- Kitchen Cabinets.
- Bathroom Mirrors.
- Bedroom Headboard.
- Shelving.
- Around Your Mounted TV.
What angle do you cut crown molding?
Using a power miter saw is the best way to cut crown moulding angles. The saw can be adjusted to cut at any angle–set it to 45 degrees for one side of a standard 90-degree corner. The saw can be set to 45 degrees to the left or 45 degrees to the right.
Related Question Answers
Does crown molding make a room look taller?
Contrary to popular belief, crown molding in a low-ceilinged room does not necessarily make the ceiling feel lower, but you need to choose wisely. The crown molding should be more vertically oriented; that is, there should be less horizontal coverage on the ceiling and more on the wall, leading the eye upward.Which side of crown molding is the top?
Crown molding can look good both ways: in its usual alignment or upside-down, which makes it difficult to determine the end that's supposed to be the top. Generally, the end with the least amount of detail goes on top, and the decorative trim faces the bottom.Can I use a brad nailer for crown molding?
Both are commonly used for installing baseboard, chair rail, door and window casing, crown molding, and door frames. One advantage to 15-gauge nails is that they are collated at an angle, which allows the nose of the nailer to reach into tighter spaces. Brad nailers use smaller 18-gauge nails up to 2 inches long.How do you cut cove molding for a ceiling?
How to Cut Cove Molding - Swing the blade of a miter saw to the left side.
- Place the molding on the left side of the blade, tight against the fence.
- Trim 1/2 inch from the face of the molding.
- Swing the blade to the right side, and lock it down at 45 degrees.
- Place a piece of molding on the right side, the profile facing you.
How do you cut and hang crown molding?
To install crown molding: - Measure the length of each wall.
- Set the miter saw to a 45° angle.
- Position the bottom of the molding against the saw fence and table.
- Tilt the molding so the back is flush with the saw fence.
- Cut the crown molding to length.
- Hold the molding on the wall, and nail it in place to the studs.
Does crown molding have to touch the ceiling?
Crown molding does not always have to be installed against both the wall and the ceiling. For a fun effect, consider installing the crown only against the wall and moving it downward about one or two inches.How do you fix uneven crown molding?
The easiest way to fix these flaws is by applying drywall mud or wood putty to the holes and gaps. Typically, drywall mud is the best option if you have painted crown molding. Stained crown molding should be filled with stainable wood putty. The putty and drywall mud molds easily to the shape desired.How do you fix an uneven ceiling?
Spread wall plaster over any holes or cracks in the ceiling, using a drywall knife. If there are larger holes or cracks (wider than an inch or so), use pieces of drywall tape as backing inside the spaces before applying the plaster. Get all the repaired areas flat and smooth. Let the plaster dry for 12 hours.Does crown molding add value to a home?
Anything that gives a house a more stylish or elegant appearance will raise its appraised value. Simple, inexpensive additions like crown molding can add dollars when an appraiser walks through your house – but only if the crown molding is done correctly and tastefully.Do bathrooms have crown molding?
While bathrooms are typically much smaller spaces, the addition of crown molding can have an even greater opportunity to elevate the space. It may be the emphasis on the top edge of the room or the slanted edge, but crown molding also has the effect of perceptually raising the ceiling height (which is always a plus).Does crown molding make a room look smaller?
Size. Crown molding does not make a room look smaller -- in most instances. The molding can be wider if the ceiling is a little higher and can be up to 6 inches wide for a very high ceiling -- up to 12 feet. Crown molding any wider than this is only suitable for very large rooms or very tall ceilings, or both.Does crown molding need to match baseboards?
No, there does not need to be an exact match between crown moldings and baseboards. Molding and trim can vary from thick to thin, wide to narrow. Matching the size and décor style of crown moldings and baseboards to each other will give a pleasing aesthetic look to your room.Should crown molding be the same throughout the house?
Crown moldings do not always have to be white. This is a frequent design faux pas; in fact, crown moldings should be the same color as the moldings that are already in your house. They can also be painted or stained to match existing color schemes, making them perfectly suitable for any room decor.Is crown molding out of style?
Not out of style at all. High quality and tasteful doesn't have a style. Custom cabinetry, crown mouldings, finished in place wood floors they are classic - never in style never out of style.What does crown molding do for a room?
Crown molding is a decorative finishing element that's normally used for capping cabinets, columns, and, most often, interior walls at the point where the wall meets the ceiling. It's only used at the top of a room, thus the term “crown” is used to describe the embellishment of a space.What can you use instead of crown molding?
Medium-density fiberboard (MDF) is another popular alternative to the traditional wooden crown molding. It is installed very much the same way as real crown molding but is cheaper and more lightweight. MDF crown molding is also very customizable, as it can be stained or painted to the color you desire.What is the going rate for installing crown molding?
The average cost to install crown molding is $7 to $16 per linear foot depending on the materials chosen and labor costs. For an average 15' x 14' living room, crown molding costs $464 to $1,102, while a 10x10 kitchen costs between $210 to $570 for both labor and installation.Can you DIY crown molding?
The hardest part of installing crown molding is cutting the corners. You can't do it like any other trim pieces because the molding sits at an angle between the wall and the ceiling (Image 1). Using a coping saw (Image 2) is the easiest way to cut the corners because a coped joint is tighter than a mitered joint.How much crown molding do I need?
Divide the total number of inches by 12 to convert from inches to linear feet. For example, if your wall measured 40 inches in length, and you are installing molding on the top and bottom, 40 x 2 = 80 inches. Divide 80 by 12 to get 6.66 linear feet.